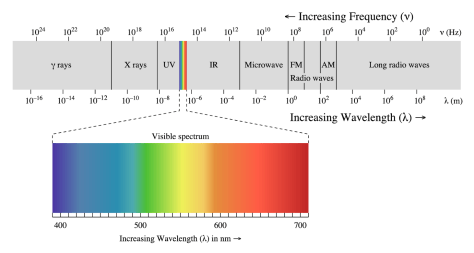
The best quote I’ve read about Infrared photography is that it is “a look into [an] invisible world.” The human eye can register light from purple to red. Beyond the red part of the spectrum, is infrared light. Infrared film photography uses photographic film to record light that can not be perceived by the naked eye.
Infrared light produces a surreal landscape. Green vegetation reflects IR making it look like snow. Clear blue sky has almost no IR, so the sky looks black, and clouds behave like vegetation, they reflect IR and come out brilliant white. Haze and fog scatter blue light, which is at a shorter wavelength than IR, so IR images cut through haze and fog.
Infrared images are especially effective when used to photograph:
- Landscapes
- Derelict buildings covered in vegetation
- Graveyards
- Haze
- Water
See the infrared gallery for examples.
Background
Visible light ranges from violet light (with a wavelength of about 400 nm), up to deep red light (700 nm). Near-infrared (IR) light starts where the deep red part of the spectrum ends, and ranges from 700 to 1000 nm. IR light should not be confused with heat. Heat is thermal infrared radiation, and is part of the far-infrared spectrum which is too long of a wavelength to register on IR film. That said, objects heated enough to glow, emit both visible and IR light, in addition to heat.
In addition to the visible spectrum, most black and white films have a limited sensitivity to near IR and UV light. Infrared films have an enhanced sensitivity to IR light, making them a better choice for IR photography. To increase the IR effect, an infrared filter is placed over the lens to remove most, or all, of the visible light from the image capture. The specific choice of filter is a function of the specific film choice and the effect desired.
Infrared Film
Today, the choice of infrared film stock is extremely limited. Basically there are only two choices, and they are both black and white.
Ilford SFX 200 is a mildly infrared film. It’s sensitivity extends weakly into the infrared. It’s sensitivity drops to 10% by 740 nm (see yellow line in the figure below), meaning that the majority of the image comes from light with wavelengths less than 740 nm.
Rollei Infrared 400 is a more traditional infrared film, with sensitivity that extends to around 830 nm (see the blue line in figure).
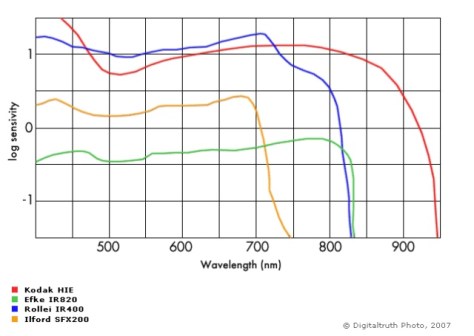
The other two films on this chart, the Kodak HIE and the Efke IR820, are no longer made.
Why all of this matters, is that you must use a filter that is complementary with the spectral response of your film.
Infrared Filters
There is a menagerie of IR filter choices. Many made sense when the Kodak HIE IR films were available, but with only two film choices, the filters with long wavelength cutoffs should be avoided.
| Filter name |
cutoff wavelength |
80%+ |
| Hoya R72 |
690 nm |
720 nm |
| Wratten #89B |
680 nm |
740 nm |
| B+W #092 |
650 nm |
730 nm |
| Wratten #87 |
740 nm |
840 nm |
| Wratten #87C |
790 nm |
880 nm |
| B+W #093 |
800 nm |
900 nm |
Since Ilford SFX 200 has a top range of 740 nm, only the first three filters (R72, #89B, and 092) make any sense when shooting SFX. For the Rollei IR 400 film, the first four filters (R72, #89B, 092, and 87) could be used, but the #87C and 093 filters peak at too high of a wavelength to be effective.
Exposure
One would think that an accurate exposure could be measured by placing an IR filter over your spot meter. But most light meters are less sensitive to IR than they are to visible light. Many were modified to filter out IR light completely to improve their visible light measurement capability. Regardless it would require a lot of testing with a fixed meter, filter, and film combination. I tried this, and eventually gave it up.
Instead, I rely on a common heuristic rule of thumb. I assume that a meter reading of visible light is proportional to the amount of IR light. It isn’t, but it ends up being close enough most of the time.
So to calibrate my exposure, I expose a test roll with all the variables fixed; a specific film (Rollei IR 400), a specific filter (B+W #092), and meter (the internal meter to my Mamiya 6). I shoot a roll of film with the meter set to an EI of 25. I select an EI of 25 to account for a filter factor of four stops. I bracket my exposures a lot! I do this at mid-day, on a day with clear skies, or no more than scattered clouds, and the sun to my back. On examining the processed film, I assess the best exposure and determine the true effective EI I need to use. In my case, I found I needed two more stops to get white vegetation and rich blacks. So I shoot Rollei 400 IR with a B+W #092 filter at an EI of 6. If I were to use a different filter, my results could be different. So I would need to rerun my exposure test.
Now, at the beginning of this I made a number of assumptions about the light. Under different conditions my rule of thumb may not hold because the level of IR radiation is not exactly proportional to the visible light. So I bracket at least one stop over and one under.
This rule of thumb has worked for me under a variety of conditions, such as:
- Not mid-day light.
- With the camera oriented at a variety of orientations with the sun.
- Not a clear sky.
Keep the following points in mind when trying to estimate your IR exposure based on a reading of the visible light.
- IR light is greatest when the sunlight is bright. The effects are strongest when the sky is clear.
- Dry air will have stronger IR light than when its humid.
- The hours just after dawn and just before dusk have a stronger proportion of IR to visible light. Light passing through the atmosphere at a low angle filters out more visible light.
- The black sky is greatest when your back is against the sun.
Focus
The correct point of focus is a function of the spectral response of the IR filter. The most prominent wavelength dictates where the focus is located. The red infrared mark on many lenses will get you close. If your lens is missing this mark, estimate the focus point by selecting a point about 20% closer. Shooting at a small aperture in order to increase the depth of field, typically solves the issue of focus.
Handling
The standard advice is to load IR film in total darkness. However I have not experienced any fogging of 120 roll film when loading in subdued light. I can not speak to 35 mm rolls.
If unable to process immediately, it is recommended that the film be stored in a refrigerator or freezer. IR film seems to be more prone to fogging and is less forgiving than other films.
The literature expresses concern that plastic developing tanks may not be opaque to IR light. I use steel tanks and have experienced no issues of fogging. Changing bags should also be tested before being trusted with IR film.
References


