Category Archives: film photography

Shooting expired film: Kodak E100 VS

I’m typically not one to be excited about shooting expired film, but when my buddy Tim Gilbert at Stearman Press told me he had a roll of my favorite discontinued Kodak transparency film, that was a different matter.

Back in the days before digital dominated photography, Kodak produced a range of different Ektachrome transparency films. My favorite was a vivid saturation variant known as E100VS. It produced highly saturated and extremely sharp images reminiscent of the bright clear colors on the pages of the National Geographic.  Unfortunately Ektachrome E100VS was discontinued early in 2012

The roll of E100VS that Tim had given me had expired in 2002. That made it 17 years past expiration when I shot it last fall. My understanding is that it had been stored in the basement of a mountain home.  So in an environment with a uniform temperature and humidity, which is pretty much the best way to store film outside of a freezer.

I shot these images using a 35mm Minolta X700 with a 50mm normal lens and no filters. The general rule of thumb for negative film is to add an additional stop of exposure for each decade. Instead I exposed the film at its box speed of ISO 100, and then bracketed by increasing the exposure by 0, +1 and +2 stops. In hind sight, I should have under exposed as well, because many of my shots were over exposed.

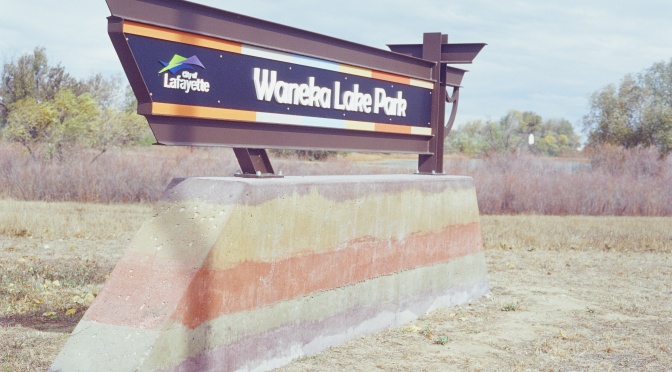
The first image, presented at the top of the article, is a recently installed sign for a local open space park. It was shot at box speed, it faithfully reproduced the muted colors in the scene.

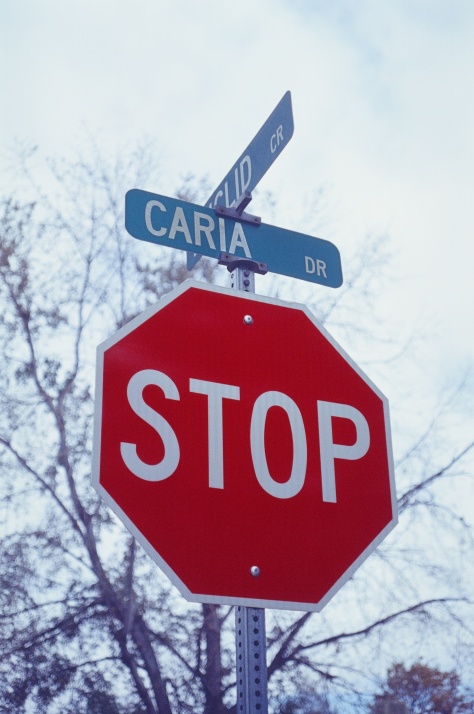
Next, I wanted to demonstrate how the E100VS captures saturated reds, something the VS film excelled at. This first image was shot at box speed. The exposure is pretty close to being correct, but the color has shifted slightly. The red isn’t as saturated as it was in reality, and the green street signs and white edging seem a bit blue.

372710830012_.jpg

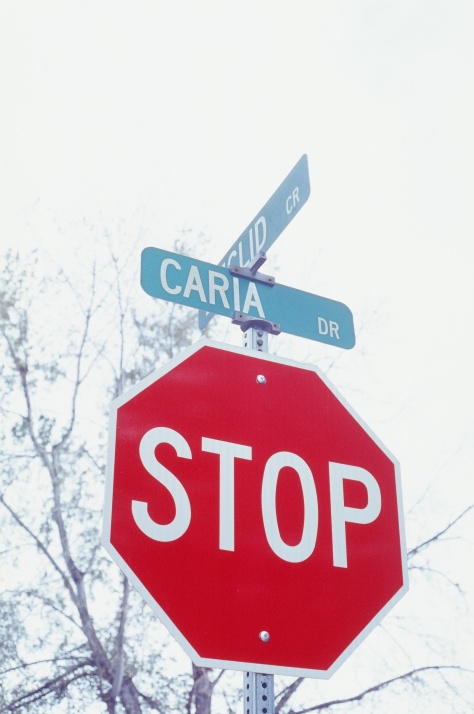
The second image was shot at one stop over the meter reading. It is clearly over exposed, but the red stop sign is truer to reality, the white border and lettering is not tinted blue, and the green street signs are faithful to reality. 372710830013_.jpg

This image is over exposed two stops. It is definitely blown out, but the red in the stop sign is vividly saturated as one would normally expect from the E100VS film. Interestingly the green hasn’t changed further.

372710830014_

Here is an image of a fire plug shot at box speed. The orange tinted red hydrant is bright and saturated.372710830015_.jpg The next image was shot one stop over exposed. It is interesting how the color shifts to be more orange, but the green in the background remains mostly unchanged.

372710830016_.jpg

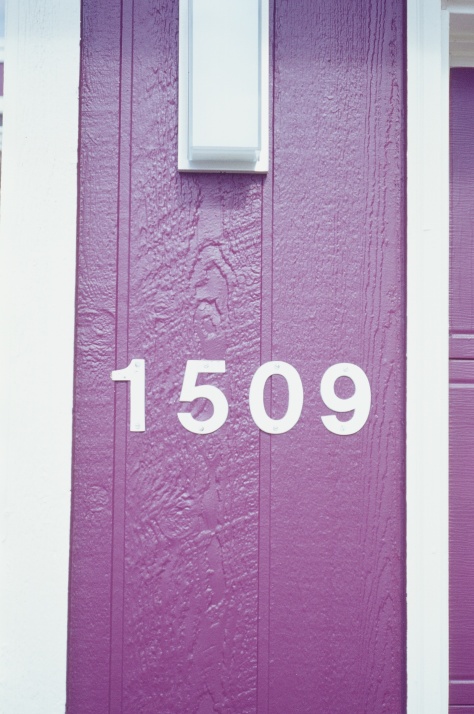
Now let’s look at some other colors. Here is the front of a purple house exposed at box speed. It is clear from the white trim that the image is probably a stop over exposed, but the purple is spot on.

372710830006_.jpg

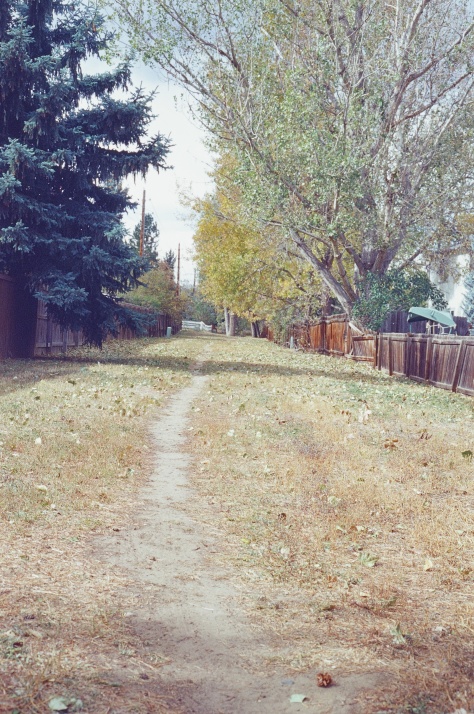
Next is an example of some vegetation in the area. This is shot at box speed and it appears to be over exposed by about a half of a stop. The greens , yellows and browns are captured faithfully, although the image is a bit flat.

372710830018_.jpg

The next image is a Denver Bronco themed SUV on our street. The team’s colors are orange and blue, which the film faithfully captured at box speed.

372710830009_.jpg


I learned a few lessons with this exercise. (1) You have to be more precise when metering a scene for slide film. This is something I knew once, but had forgotten.  (2) If well stored, even 20 year old slide film may retain its original ISO. (3) Rather than modifying the overall sensitivity of the film, aging seems to have introduced subtle color shifts in part, but not all, of the spectrum.

Rediscovering the Wanderlust Travelwide as a 4×5 Pinhole Camera

In 2013, Wanderlust Cameras launched a Kickstarter campaign to fund the creation of a 4×5 box camera with a helix focusing system, called the Travelwide. The Travelwide was made from injection molded ABS plastic and designed to work with a Schneider Angulon 90mm ƒ/6.8 lens. An adaptor for a wider fixed focus version, built around the Schneider Super Angulon 65mm ƒ/8, was produced as a later add on. A 0.3175mm pinhole insert came with the camera, so that you could start shooting immediately. It was one of the first of the recent wave of affordable large format cameras, and it was my first large format camera. At $149, the camera cost less than the Schneider Angulon 90mm ƒ/6.8 they recommended pairing it with.

img_0044r
My Travelwide fitted with a Schneider Super Angulon 90mm ƒ/8. At the time, I could not find the ƒ/6.8 lens anywhere because all the other Travelwide owners had scooped them up. The larger 90mm ƒ/8 lens made the camera very front heavy.

I backed the Travelwide in 2013 and waited, and waited, and waited. The project was plagued with production issues, but Wanderlust Cameras was determined to get it right. It was actually informative how they turned their production setbacks into a learning experience.

Towards the end of 2015, my Travelwide arrived unexpected in the mail. While my enthusiasm had waned somewhat over the two years it took for the camera to arrive, I decided it was a perfect fit for a “52 Rolls” project I was joining in 2016. The idea behind “52 Rolls” is to shoot and post one “roll” of film, every week, for a year. For large format, I interpreted a “roll” to mean the two sheets of 4×5 film held in a single standard film carrier. If you haven’t done something like this before, it is a great exercise to get one in the habit going out and shooting frequently.

The pinhole insert provided by Travelwide has a diameter is 0.3175mm. That corresponds to a range of f-stops depending on the position of the focusing helix.

  • ƒ/283 at 90mm (helical fully retracted)
  • ƒ/346 at 110mm (helical fully extended)
  • ƒ/205 at 65mm (with 65 Conversion Kit)

From the f-stop I calculate the length of the exposure using a handheld light meter.

In the past I’d found 35mm and medium format pinhole images unsatisfying. That changed when I started making large format pinholes.

Here are three examples below, made at the Fort Lancaster recreation. The Fort Lancaster recreation was created by the The South Platte Valley Historical Society using building methods of the 1840’s, and adjacent to its original location. The trading fort is located in what is now Fort Lupton, Colorado.

roll2018005-01aroll2018005-02aroll2018005-03a

These images were made on the now discontinued Fuji ACROS Neopan 100 because of its reciprocity characteristics. The film underwent standard development with Clayton F76+ developer.

My first win in a juried show

18070001A.jpg

This is my first win in a juried show. The show was the Denver Architecture Foundation‘s Y/OUR Denver show, which is hosted by The Colorado Photographic Arts Center. The category was best interior.

This image was made in 2015 at the old Denver Central Catholic High School. The school had been closed for more than a decade and was then being used as Artist spaces. I was there attending a workshop by our Christopher James and saw this composition as I was packing up to leave. The building has since been sold to a developer who plans to convert it to condos.

I liked the multiple spaces, both interior and exterior within the frame. This image was made on 120 size Kodak TMAX 400 film, and shot using a Mamiya 6 with a 50mm wide angle lens. I prefer using film to capture night time shots because of its unique response to light and dark.

2018 International Pinhole camera day

The 2018 International Pinhole camera day was April 29th of this year. Earlier in the month we went to Fort Lancaster in Fort Lupton Colorado to make some images.

Fort Lancaster is a recreation of the 1840’s trading fort located in what is now Fort Lupton Colorado. The fort was created by the The South Platte Valley Historical Society using building methods of the time.

This is my favorite image of the day because it has nice forced perspective from the stairs.

roll2018005-03A

I made this image with a Travelwide 4×5 camera and a f/285 pinhole insert. For film I used the now discontinued Fuji Neopan Acros 100 4×5 sheet film. Normal development was done with Clayton F76+ developer. I like the Neopan Acros for pinhole images, because I don’t need to be concerned with reciprocity  corrections to the film exposure. When I read that it was being discontinued I bought a few boxes and stored it in the freezer. I figure I’ve got enough for a couple more years.

More pinhole images from the day can be viewed at Kelly Little Dog at WordPress.

Economies of film cameras

(Updated on 4/18/2018)

Social media is filled with the unquestioned misconception that film photography is prohibitively expensive. You see it stated in recent writings such as Mason Resnick’s “5 reasons why I am never going back to film.” The perception of digital being more economical than film comes from the fact that shooting digital is largely a fixed cost. The initial purchase of a digital camera accounts for a large portion of its lifetime costs, while shooting film requires an ongoing expenditure for film and processing. But if asked, few people could tell you just how expensive it is to shoot film. So, let’s conduct a little thought experiment. Let’s compare the cost of purchasing and shooting two different types of DSLRs, to the cost of getting an equivalent film camera and shooting/developing film in that camera for the typical lifespan of the respective DSLR.

Let’s consider two cases. At the high end, a lightly used Canon 5DS, with a 24-120 mm zoom lens, costs around $4500 ($2750 for the camera body and $1750 for the zoom lens). The average life span of a camera like the Canon 5DS is between eight to ten years. Let’s assume nine. Let’s add in another $700 to cover expendable costs such as an extra memory card or two, an extra battery, and a sensor cleaning every other year. So, at the high end we are looking at roughly $5200 over a period of nine years. At the low end let’s consider a used crop-sensor DSLR such as a Nikon D7100. Such a camera has an average life span of about seven years. The D7100 plus a kit lens, would run you about $700. Add in an extra $500 for an extra battery, an extra memory card or two, and three sensor cleanings over the life span of the camera and shooting the D7100 would run roughly $1200. We will ignore the cost of things like a computer, software like Lightroom, and an inkjet printer, because you might also want these when shooting film.

The Canon 5DS is a pro-level, full frame, DSLR with a resolution of just over 50 Mega-pixels. Let’s compare the Canon against a Mamiya 645AF. The Mamiya 645AF is a medium format, auto-focus film camera, that produces a 645 sized negative which can be scanned at a resolution of over 50 MP. A Mamiya 645AF can be purchased on EBAY or KEH, along with a couple of lenses, for as little as $650. While other medium format cameras can be had for less, the Mamiya 645AF is the closest in function to a pro-level full frame DSLR, and therefore a more direct comparison. Now, what about the expendables. I shoot about 50-60 rolls of medium format film a year. That averages to about one roll a week. Unless you are a professional who has regular shooting jobs, 50 rolls of film (800 shots with the 645) should be more than sufficient for a year’s worth of shooting. Today, in the USA, 120 roll film can be had for between $4 to $9 a roll. Let’s pick the midpoint of $6.50 per roll. Fifty rolls would cost $325, or about 40 cents a shot. What about development? I’m able to process those 50 rolls, if they are B&W film, for less than $100 of chemistry per year. C-41 color development costs more. I send mine out to a lab, which offers a bulk rate of $10.20 per roll when processing five or more rolls. Let’s say I shoot and develop an additional ten rolls of C-41 color film. The color film and processing would then cost around $167. Total expendables for a year of shooting film, costs me under $500. This number reflects my style of shooting, “your mileage may vary.”

Crunching the numbers, I could buy the Mamiya 645AF and shoot film for just over nine years for the cost of the Canon 5DS. Let me repeat that. For the cost of a top of the line full frame DSLR plus normal operating costs, I could buy a medium format auto-focus camera and shoot brand name film for over nine years. If I cut out the rolls of color film, I could extend that to fourteen years of shooting B&W. Shooting a medium format film camera is therefore comparable in cost to shooting a full frame professional level DSRL. While this can be considered extravagant, it is well within the norm of what many digital shooters spend.

Now what about someone who is shooting on a budget. We have already shown that a used Nikon D7100, plus extras, would run you about $1200 for the seven-year, average life span of the camera. Let’s compare that to the cost of shooting B&W film in a 35mm SLR for that same period. A manual SLR with a couple of lenses can be had for under $250. A 100 ft bulk roll of Arista EDU film runs around $50. A 100 ft roll should give you around eighteen 36-exposure rolls, or about 648 shots. Let’s budget a roll and a half in order to get 972 shots. The chemistry to process those 972 shots would again run you around $100. So, the total cost for a budget shooter’s expendables runs around $175/yr. At $175/year for film and processing, you could shoot film for nearly five and a half years for the cost of the D7100. That is roughly 75% of the life span of the D7100.

Both of these examples show that the cost of shooting film CAN BE roughly the same as buying and maintaining an equivalent DSRL. The key assumption is that you will need to do most of your own film processing. If you send your film to a lab, or mostly shoot color, or shoot significantly more than 1000 images a year, the calculation swings solidly in favor of a digital camera.

Don’t get me wrong, I don’t think everyone should be shooting film. Digital surpasses film in many instances, such as when shooting active subjects, in low/natural lighting conditions, and under circumstances where you must be certain that “you got the shot.” And shooting film requires additional work, such as loading and processing the film. But I shoot film because I enjoy the process and it is complementary to my style of making photographs. I enjoy working in the darkroom and I prefer making silver gelatin prints in a darkroom over spending more time in front of a computer and struggling with an inkjet printer. Cost isn’t really a factor in my decision to shoot film, as long as it is affordable. But that is me, not you. Your needs and preferences are going to be different, and it is up to you to figure them out. Just stop telling me that it’s too expensive to shoot film, because I’ve shown here that for how I like to shoot, it’s about the same cost as shooting digital.

Technical Note: Infrared Film Photography

The best quote I’ve read about Infrared photography is that it is “a look into [an] invisible world.” The human eye can register light from purple to red. Beyond the red part of the spectrum, is infrared light. Infrared film photography uses photographic film to record light that can not be perceived by the naked eye.

Infrared light produces a surreal landscape. Green vegetation reflects IR making it look like snow. Clear blue sky has almost no IR, so the sky looks black, and clouds behave like vegetation, they reflect IR and come out brilliant white. Haze and fog scatter blue light, which is at a shorter wavelength than IR, so IR images cut through haze and fog.

Infrared images are especially effective when used to photograph:

  • Landscapes
  • Derelict buildings covered in vegetation
  • Graveyards
  • Haze
  • Water

See the infrared gallery for examples.

Background

Visible light ranges from violet light (with a wavelength of about 400 nm), up to deep red light (700 nm). Near-infrared (IR) light starts where the deep red part of the spectrum ends, and ranges from 700 to 1000 nm. IR light should not be confused with heat. Heat is thermal infrared radiation, and is part of the far-infrared spectrum which is too long of a wavelength to register on IR film. That said, objects heated enough to glow, emit both visible and IR light, in addition to heat.
Electromagnetic_Wave-20

In addition to the visible spectrum, most black and white films have a limited sensitivity to near IR and UV light. Infrared films have an enhanced sensitivity to IR light, making them a better choice for IR photography. To increase the IR effect, an infrared filter is placed over the lens to remove most, or all, of the visible light from the image capture. The specific choice of filter is a function of the specific film choice and the effect desired.

Infrared Film

Today, the choice of infrared film stock is extremely limited. Basically there are only two choices, and they are both black and white.

Ilford SFX 200 is a mildly infrared film. It’s sensitivity extends weakly into the infrared. It’s sensitivity drops to 10% by 740 nm (see yellow line in the figure below), meaning that the majority of the image comes from light with wavelengths less than 740 nm.

Rollei Infrared 400 is a more traditional infrared film, with sensitivity that extends to around 830 nm (see the blue line in figure).
nicer film response

The other two films on this chart, the Kodak HIE and the Efke IR820, are no longer made.

Why all of this matters, is that you must use a filter that is complementary with the spectral response of your film.

Infrared Filters

There is a menagerie of IR filter choices. Many made sense when the Kodak HIE IR films were available, but with only two film choices, the filters with long wavelength cutoffs should be avoided.

Filter name cutoff wavelength 80%+
Hoya R72 690 nm 720 nm
Wratten #89B 680 nm 740 nm
B+W #092 650 nm 730 nm
Wratten #87 740 nm 840 nm
Wratten #87C 790 nm 880 nm
B+W #093 800 nm 900 nm

Since Ilford SFX 200 has a top range of 740 nm, only the first three filters (R72, #89B, and 092) make any sense when shooting SFX. For the Rollei IR 400 film, the first four filters (R72, #89B, 092, and 87) could be used, but the #87C and 093 filters peak at too high of a wavelength to be effective.

Exposure

One would think that an accurate exposure could be measured by placing an IR filter over your spot meter. But most light meters are less sensitive to IR than they are to visible light. Many were modified to filter out IR light completely to improve their visible light measurement capability. Regardless it would require a lot of testing with a fixed meter, filter, and film combination. I tried this, and eventually gave it up.

Instead, I rely on a common heuristic rule of thumb. I assume that a meter reading of visible light is proportional to the amount of IR light. It isn’t, but it ends up being close enough most of the time.

So to calibrate my exposure, I expose a test roll with all the variables fixed; a specific film (Rollei IR 400), a specific filter (B+W #092), and meter (the internal meter to my Mamiya 6). I shoot a roll of film with the meter set to an EI of 25. I select an EI of 25 to account for a filter factor of four stops. I bracket my exposures a lot! I do this at mid-day, on a day with clear skies, or no more than scattered clouds, and the sun to my back. On examining the processed film, I assess the best exposure and determine the true effective EI I need to use. In my case, I found I needed two more stops to get white vegetation and rich blacks. So I shoot Rollei 400 IR with a B+W #092 filter at an EI of 6. If I were to use a different filter, my results could be different. So I would need to rerun my exposure test.

Now, at the beginning of this I made a number of assumptions about the light. Under different conditions my rule of thumb may not hold because the level of IR radiation is not exactly proportional to the visible light. So I bracket at least one stop over and one under.

This rule of thumb has worked for me under a variety of conditions, such as:

  • Not mid-day light.
  • With the camera oriented at a variety of orientations with the sun.
  • Not a clear sky.

Keep the following points in mind when trying to estimate your IR exposure based on a reading of the visible light.

  • IR light is greatest when the sunlight is bright. The effects are strongest when the sky is clear.
  • Dry air will have stronger IR light than when its humid.
  • The hours just after dawn and just before dusk have a stronger proportion of IR to visible light. Light passing through the atmosphere at a low angle filters out more visible light.
  • The black sky is greatest when your back is against the sun.

Focus

The correct point of focus is a function of the spectral response of the IR filter. The most prominent wavelength dictates where the focus is located. The red infrared mark on many lenses will get you close. If your lens is missing this mark, estimate the focus point by selecting a point about 20% closer. Shooting at a small aperture in order to increase the depth of field, typically solves the issue of focus.

Handling

The standard advice is to load IR film in total darkness. However I have not experienced any fogging of 120 roll film when loading in subdued light. I can not speak to 35 mm rolls.

If unable to process immediately, it is recommended that the film be stored in a refrigerator or freezer. IR film seems to be more prone to fogging and is less forgiving than other films.

The literature expresses concern that plastic developing tanks may not be opaque to IR light. I use steel tanks and have experienced no issues of fogging. Changing bags should also be tested before being trusted with IR film.

References